
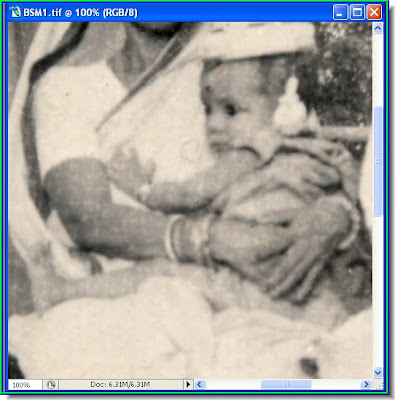
Step 2 : I have zoomed in on a portion of the image to show how scarred and pitted it is in some parts.
Step 3 : First duplicate the Background by dragging it to the new layer icon (red arrow). This will form a Background copy layer (blue arrow).
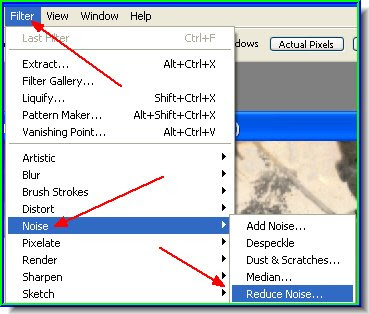
Step 4 : Go to Filter>Noise>Reduce Noise. Step 5 : When the Noise Removal dialogue box (part of it shown above) drag the sliders as shown. Click ok. Sometimes it is required to apply the Noise Removal filter twice. I have used it twice.
Step 6 : The skin has become smooth after using the Noise Removal Tool twice. But it has also blurred out details like the eyes, lips and ornaments. This can be fixed.
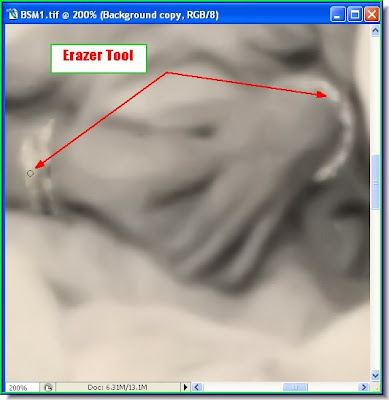
 Step 7 : I have zoomed in on the image and clicked the Erazer Tool to select it.

Step 8 : With the Erazer Tool I am erazing the eye. Remember this is the Background copy layer I am using and not the original. Step 9 : I am now erazing the lips in the Background Copy layer to reveal the original Background layer to retain sharpness in details such as eyes and lips and ornaments.
Step 10 : Other areas such as the baby's eyes, the bangle and the border of the sari have been erazed.
Step 11 : Some more details like the bangles have been erazed.
Step 12 : Some more details erazed.
Step 13 : This is how the image now looks. Now go to Layer>Flatten Image. Step 14 : Now press CTRL+SHIFT+N on your keyboard. This will bring up the New Layer dialogue box. Change the Mode to Color and reduce Opacity to 50 %. Click okay.
Step 15 : Now go to the Color/Swatches/Styles pallete on the right panel and click on Swatches to bring it up. Then click the white shown by the red arrow.
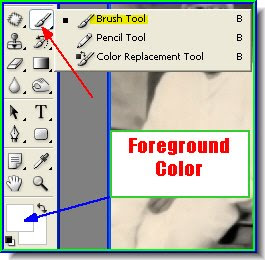
Step 16 : Now click the Brush Tool. Notice that the Foreground color has changed to White after you clicked the white in Swatches. Step 17 : I am brushing away the yellowish portions remaining. The upper part of the photo has turned whiter, while the lower portion still shows traces of yellow. I will wipe it away.
 Step 18 : Now the yellowish stains remaining have gone. Press SHIFT+CTRL+E to Merge Layers.
 Step 19 : Go to Image>Calculations.
 Step 20 : In the Calculations dialogue box, I have chosen Red channel in Source 2. See above. This will heighten the contrast. Sometimes instead of Red channel, the Green and Blue channels might offer better contrast. It will depend on the image. Click ok.
 Step 21 : Go to Image>Adjustments>Brightness/Contrast.
 Step 22 : Since I have increased the contrast already, I will only drag the Brightness slider a little. Click ok.

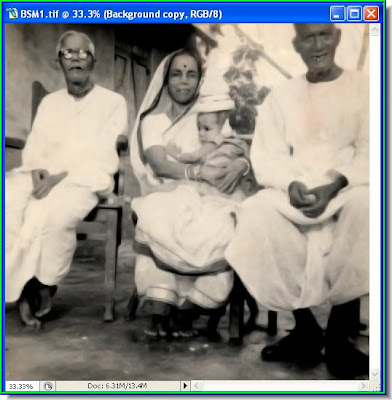
The finished image. Compare it with the one I began with a notice the difference.
No comments:
Post a Comment