Saturday, August 30, 2008

Changing Hairstyle wih Warp Tool in PS CS 2

Hairstyles can be changed as I have shown here. Let me show another way this can be done. The Warp Tool in Photoshop Cs 2 and above and a Quick Mask can be used to change a hairstyle with a little bit of pateince.

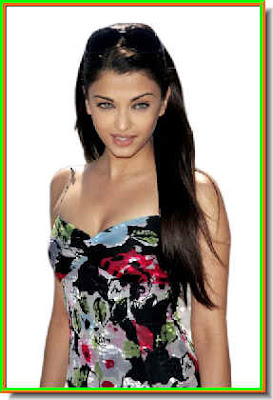
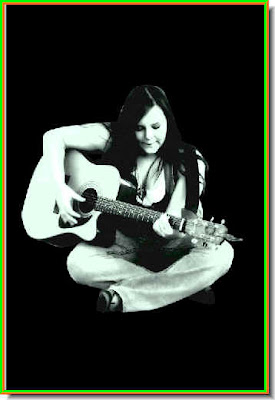
I will use this photo of Aishwairya Rai Bacchan to demonstrate how a hairstyle can be changed with a Quick Mask and the Warp Tool. The Warp Tool cannot be found in Photoshop 7.

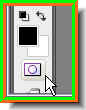
This is the Quick Mask button. It toggles between the Edit in Quick Mask and edit in Standard Mode.
Step 1 : Click it once and the Quick Mask button light up briefly. Step 2 : Click the Brush Tool to select it.
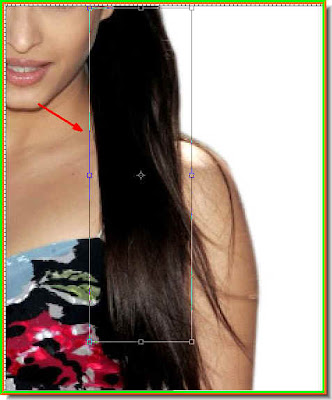
Step 3 : I have zoomed into the image. With the Quick Mask on I have painted a bit of the hair.
Step 4 : Now click this once button once to Edit in Standard Mode.

Step 5 : The red mask disappears and is replaced by a selection of 'marching ants'.

Step 6 : With the selection of 'marching ants' in place, press CTRL+J. This will copy and paste the selection onto a new layer i.e. Layer 1.

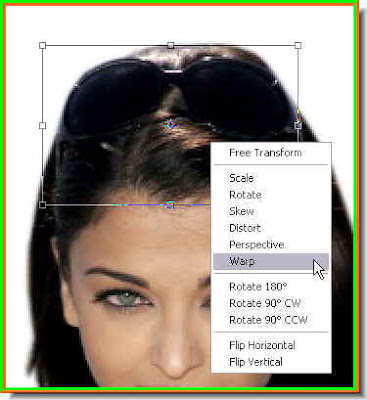
Step 7 : Press CTRL+T. A selection will appear.

Step 8 : Right click inside the selection. A popup appears. Click Warp from it.

Step 9 : The Warp grid can be seen.

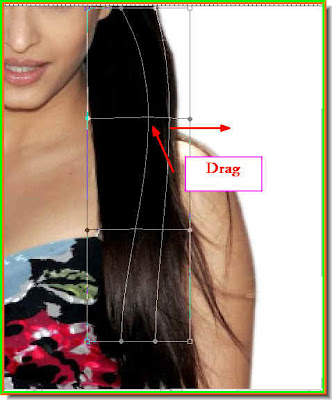
Step 10 : Drag the point of the grid outwards as shown.

Step 11 : Now drag a second point of the grid as shown outwards.

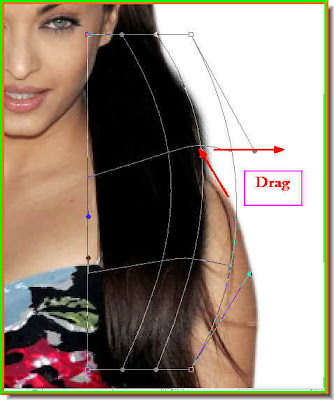
Step 12 : Now drag this handle outwards.

Step 13 : Now drag out the other handle outwards.

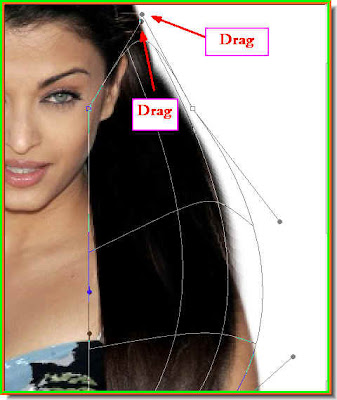
Step 14 : Now drag out this point outwards again.

Step 15 : Now drag the second point outwards.

Step 16 : Now drag both the points outwards one at a time.

Step 17 : Now drag these two handles upwards. I am only showing you the handles should be dragged. The points will be different with the image you use.
Step 18 : After you are satisfied with the effect of the Warp press ENTER. The
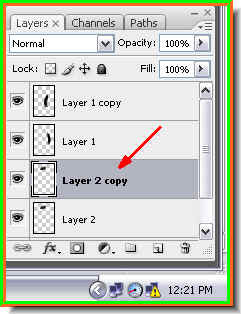
Warp will be be committed. You can see how the hair now looks fuller as it drops down from the shoulder. Step 19 : Press CTRL+J. This will duplicate Layer 1 as Layer 1 copy.

Step 20 : Press CTRL+T. This will form a selection. Right click inside the selection. From the popup click on Flip Horizontal.

Step 21 : The selection of hair has been flipped horizontally. But it has to be repositioned.

Step 22 : Reposition the selection with the cursor.

The hair as it looks now. Much more fuller than we began with. Compare it with the image we began with.

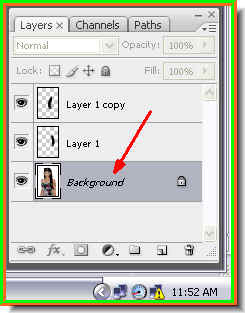
Step 23 : Click back on the Background.
Step 24 : Click the Edit in Quick Mask button.

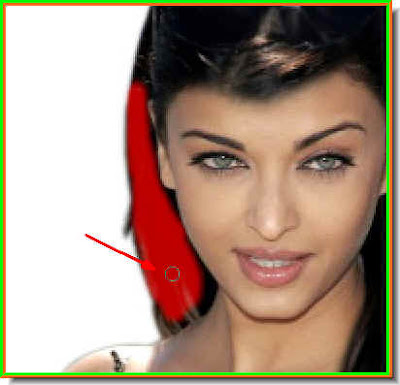
Step 25 : With the Brush Tool paint a selection in another part of the hair.

Step 26 : Press the Edit in Standard Mode button (which is the same as the Edit in Quick Mask button). Press just once and the red mask goes away. It is replaced by a selection of 'marching ants'.

Step 27 : With the selection in place press CTRL+J. This will copy and paste the selection to a new layer -- Layer 2.

Step 28 : Press CTRL+T. A selection appears. Right click inside the selection and from the popup click on Warp.

The Warp grid becomes visible.

Step 29 : Drag down the points of the Warp grid in the middle as shown.

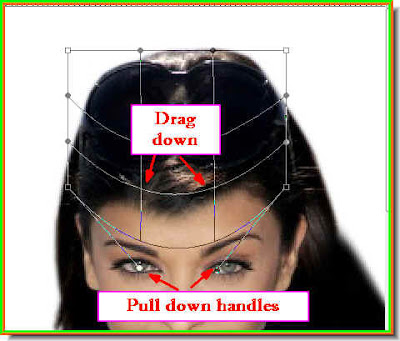
Step 30 : Now drag down the grid points in the middle again. Then drag down the handles as shown. Press Enter.
This is how the hair looks.

Step 31 : Press CTRL+J. This will copy and paste the hair to another layer -- Layer 2.

Step 32 : Press CTRL+T. This will bring up a selection. Right click inside it. From the popup click on Flip Vertical.

Step 33 : Push up the flipped selection with the cursor.

This is how the hairstyle looks.

Step 34 : Click back on the Background layer.
Step 35 : Click the Edit in Quick Mask Mode button.
Step 36 : Click the Brush Tool.

Step 37 : Paint a section of the hair with the brush.
Step 38 : Click the Edit in Standard Mode button.

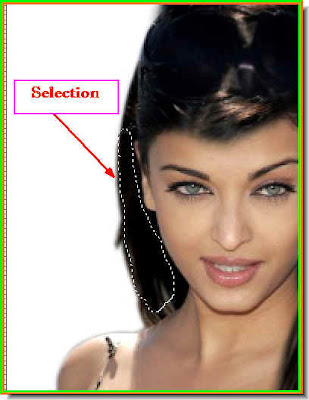
Step 39 : A selection appears.

Step 40 : Press CTRL+J. This will copy and paste the selection on a new layer -- Layer 3.
Step 41 : Press CTRL+T. A selection appears. Right click inside it. From the popup choose Warp. Step 42 : From the Warp grid drag out the grid lines and the handles as shwon. Press Enter when finished.

There ! Does not Mrs Rai Bachan have a lovelier head of hair now ? Try it out.


Wednesday, August 27, 2008

Poster -- Retro Look

Let us create a poster with a retro look. Perhaps one with a black background and some simple lettering. This can be done in Photoshop CS 2 and above.

I have opened this photo in Photoshop. If you want to use it too, you can download it here. You have to cut it out from its background for use in the poster.
You can use the Magnetic Lasso or the Pen Tool to cut it out. You can use whichever Tool you want. Or you can also use the Extract Tool. Use whichever tool you are familiar with to extract the girl from the image. Click the highligted links for tutorials on the tools.

Step 1 : Press CTRL+J on the keyboard. This will duplicate the Background layer. After duplication click off the eye icon of the Background Layer. The Background will not be used. Should something go wrong you will have the unused background layer to fall back on. This is a simple precaution you should take every time.

Step 2 : I have cut out the figure of the girl from the image.

Step 3 : Press CTRL+ALT and click on the New Layer icon. This form a new layer directly below the one we are working on.

Step 4 : As soon as you click the New Layer icon. This dialogue box pops up. Click ok.

Step 5 : A new layer forms below the layer of the extracted girl as Layer 3. Layer 2 is the one with extracted girl. I have extracted it from Layer 1. I have also clicked off the eye icon of Layer 1. Below it is the Background layer. I have also clicked off its eye icon.

Step 6: Make sure that the Foreground Color is set to Black.

Step 7 : Pres ALT+BACKSPACE. This will fill the layer with Black.

This is how the image looks.

Step 8 : Go to Filter>Blur>Surface Blur. (This cannot be done in PS7 as this filter is not available). Also the values are not hard and fast. This is a high resolution image. If you have an image of a low resolution give a lesser blur.

Step 9 : The Surface Blur dialogue box opens. These are the values I have set for this image.

This is how the image looks.

Step 10 : Press CTRL+SHIFT+U. This will desaturate the image.

Step 11 : Go to Filter>Adjustments>Selective Color. This filter is also not found in PS7.

Step 12 : In the Selective Color dialogue box choose Blacks from the drop down menu.

Step 13 : Set the Black to 100 %.

Step 14 : Now choose the Whites from the dropdown menu.

Step 15 : Set a value of 54 % for Black. Now click ok in the Selective Color dialogue box.

Step 16 : Go to Image>Adjustments>Photo Filter. This is not available in PS7.
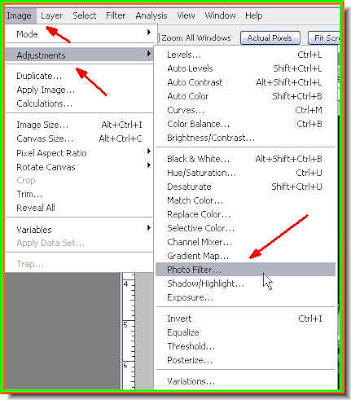
Step 17 : The Photo Filter dialogue box opens. Click the square of color the small hand points to.

Step 18 : The Select Filter Color dialogue box opens up. In the highlighted rectangle type 266850. It is a shade of green. As soon as you type in the value it will choose the particular shade. Click ok

Step 19 : Now drag the Density slider to 70 %. Click ok.

This is how the image looks.
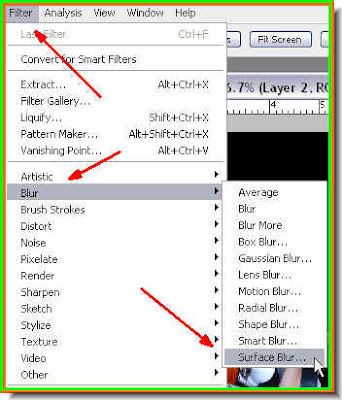
Step 20 : Go to Filter>Blur>Gaussian Blur.

Step 21 : The Gaussian Blur dialogue box opens. I have given a Radius of 5 pixels. If you are using a low resolution image give a Radius of 1 or 1.5 pixels.

This is how the image looks.

Step 22 : Go to Edit>Fade Gaussian Blur.

Step 23 : In the Fade dialoge which opens. Change the Mode to Linear Light from the dropdown menu. Reduce the Opacity to 30 %. Click ok.

Step 24 : Go to Filter>Artistic>Film Grain.

The Film Grain dialogue box opens.

Step 25 : Set the Grain, Highlight Area and Intensity to 3. Click ok.

This is how the image looks.
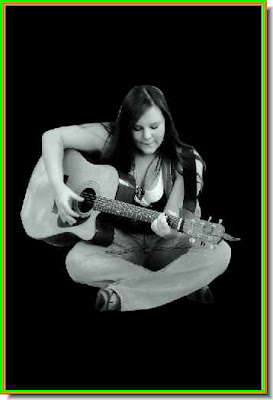
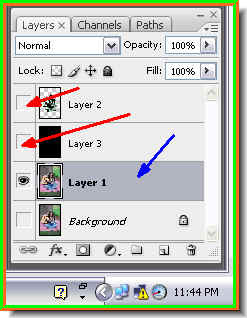
Note we have been working on Layer 2.

Step 26 : Press CTRL+J. This will duplicate Layer 2 as Layer 2 copy. Now reduce the Opacity of the Layer to 50 %.

Step 27 : Go to Filter>Brush Strokes>Angled Strokes.

Step 28 : The Angled Brush Strokes dialogue box opens.

Step 29 : Apply the settings shown and click ok.

Step 30 : Press CTRL+E. This will merge Layer 2 copy with Layer 2.

Step 31 : Press CTRL+L. This will bring up the Levels dialogue box.

Step 32 : Drag the Black slider at left till the value reads 90. You can also just put the value in the box.

Step 33 : Click the Erazer to select it.

Step 34 : The image has blended with the Black background nicely, but some white edges are showing. Use the Erazer Tool to gently wipe them out.

This is how the image looks.

Step 35 : Click back on Layer 1, which is the color image. Click off the eye icons in Layer 3 and 2. The image will now appear in color. Cut out the guitar by making a selection with the Pen Tool or the Magnetic lasso. The press CTRL+J.

Step 36 : Pressing CTRL+J will copy and paste the selection onto a new layer -- Layer 4. Now turn off the eye icon on Layer 1.

Step 37 : Now use the cursor to drag Layer 4, which contains the guitar to the top.

This is how the image now looks.

Step 38 : Press SHIFT+ALT and click the new layer button.

A new layer - Layer 5 has formed on top of Layer 4 (the guitar layer).

Step 39 : Make sure the Foreground is set to Black and Background to White. If it is not press'x' then 'd' on the keyboard. It will set it to the default.

Step 40 : Click on the Gradient Tool.

Step 41 : Keeping SHIFT pressed draw the Gradient halfway across the image. You will find you can draw it in a straight line.

The Gradient has been applied.

Step 42 : Click the Type Tool and choose Horizontal Type Tool.

Step 43 : Click where the red arrow points to to reveal the fonts available. I have clicked on Broadway BT.

Step 44 : You can set the Size of the Font (red arrow), align the margin (green arrow). I have chosen central alignment. Then there is the Text Color box (blue arrow).

Step 45 : The color of the Text by default is always set to Black. Click where the small white hand points to.

Step 46 : This brings up the Select Text Color dialogue box. Look at the red arrow. Type ffffff in it i.e. 6 fs. It is the color White. The text color will be White. Click ok.

The Text color has changed to White in the top panel.

Step 47 : Draw out the text box with the cursor.

Step 48 : I have typed in the Text.

Step 49 : Click the Tick Mark in the top panel to commit the Text.

The poster as it looks now.

Step 50 : Click on Swatches to reveal the Swatches pallette.

Step 51 : The Swatches pallette is revealed. I have clicked on the Swatch shown by the small white hand.

This is how the poster looks.

Step 52 : Press SHIFT+ALT and click on the New Layer icon.

A new layer forms above the Text Layer.

Step 53 : Click on the Pencil Tool

Look at the top panel at the left. The Default thickness of the Pencil Tool is set at 1 pixel. Leave it at that.

Step 54 : Press x then d then x again on your keyboard to set the Foreground Color to White.

Step 55 : Keeping the SHIFT key pressed draw a line with the Pencil. (By the way, since this is a high resolution image, I have changed the thickness of the Pencil to 15 pixel). Your line will be a straight line.
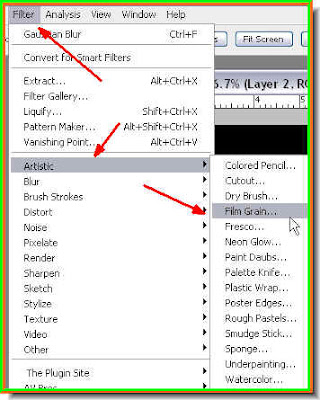
Step 56 : Go to Filter>Blur>Motion Blur.

Step 57 : In the Motion Blur dialogue box set the Angle at 0 and Distance at 200. If you are using a low resolution image set the Distance at a much lower value.

The Motion Blur has been applied.

Step 58 : Click on the Erazer Tool.

Step 59 : I have erazed the blur to the left where the line begins.

Step 60 : Press SHIFT+ALT and click the New Layer icon. A New Layer -- Layer 7 forms.

Step 61 : Use the Pencil Tool to draw a line vertically down. Keep the SHIFT key pressed.

Step 62 : Apply the Motion Blur. Put the Angle at 90. The Distance will remain unchanged at 200 or whatever value you have used.

This is how the Vertical line looks. Use the Erazer to eraze the end of the line at the top.

Step 63 : I have erazed the top of the vertical line.

Make two more layers and add the lines at the bottom in just a similar way. The Retro looking poster is complete. That is all.