PART I

Step 1 : Open a new white layer.

Step 2 : Make sure the Foreground Color is set to Black.

Step 3 : Press ALT+BACKSPACE to fill the white layer with the Foreground color which is Black.

Step 4 : Press CTRL+SHIFT+N to create a new layer and this dialogue box pops up. Click ok.

Step 5 : A new layer -- Layer 1 forms above the Background layer.
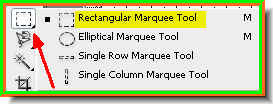
Step 6 : Select the Rectangular Marquee Tool by clicking it.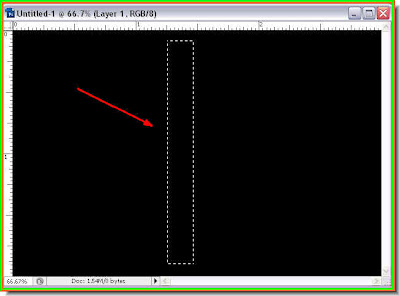
Step 7 : Draw a narrow rectangular selection as shown with the Marquee Tool.

Step 8 : Make sure the Background color is set to White. If the default colors are not set. Press 'x' then 'd' on the keyboard.

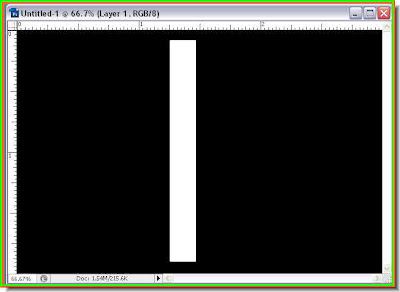
Step 9 : Press CTRL+BACKSPACE to fill the selection with the Background color which is White. Press CTRL+D to deselect and 'marching ants' selection will go away.
The 'marching ants' selection is no longer there after pressing CTRL+D.
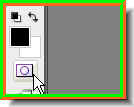
Step 10 : Click the Quick Mask button (shown by the white arrow) once.

This is how it looks after pressing the Quick Mask button once.
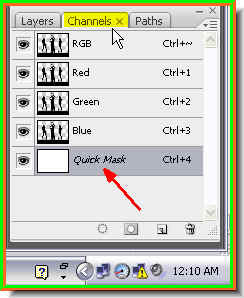
You will not find any change when you click the Quick Mask button. Look in the channels pallette and you will find that it has formed at the bottom. Click back onto the Layers pallette.
Step 11 : Click on the Gradient Tool.

Step 12 : In the top panel click where the arrow points to, to bring up the Gradient Editor.

Step 13 : The Gradient Editor opens. Click on the second Gradient from left in the top row as shown by the small white hand to select it. Click ok.
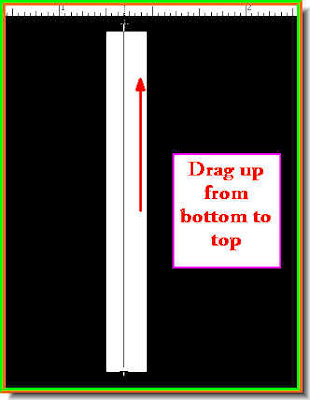
Step 14 : Keeping the SHIFT key pressed drag with the Gradient Tool from the bottom to top. You will find that you can drag it up in a straight line. This is because you are keeping the SHIFT key pressed.
Step 15 : This is how the image looks.
Step 16 : Click the Quick Mask button once again to Edit in Standard Mode or to emerge from the Quick Mask.
Step 17 : You will find a selection right across the middle to the image as shown above.
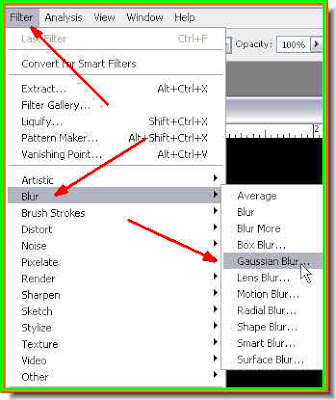
Step 18 : Go to Filter>Blur>Gaussian Blur.
Step 19 : The Gaussian dialogue box opens. I have given a Radius of 18 pixels. There is nothing hard and fast about it. It will depend on your image.

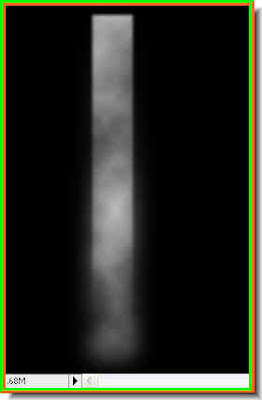
Step 20 : This is how the image looks. The blur tapers off from the bottom to top. Click ok. Press CTRL+D to deselect.
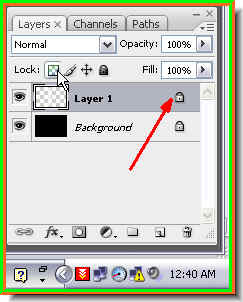
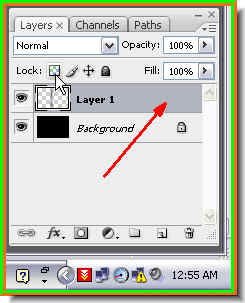
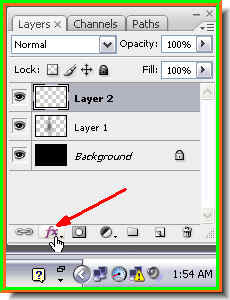
Step 21 : Now lock the transperance of the layer by clicking on the little chequered box shown by the white arrow. Notice that as soon as you click it a lock icon appears in the layer.
Step 22 : Make sure that the Foreground is set to Black and Background to White.
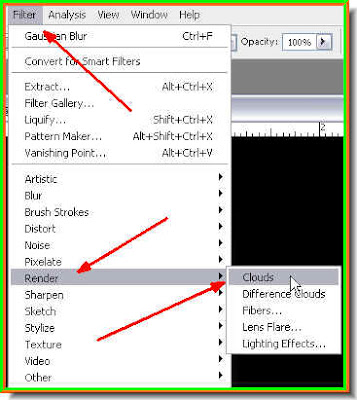
Step 23 : Go to Filter>Render>Clouds.
Step 24 : This is the effect you get. Press CTRL+F a number of times.

And your image will look something like this.
Step 25 : Click the Lock Transperancy button to unlock. Note that the lock icon on the layer disappears.
Step 26 : Go to Filter>Blur>Gaussian Blur.

Step 27 : I have given a Radius of 2.5 pixels for the Gaussian Blur. You can set it a little less or a little more depending on your image. Click ok.
Notice that the hard edges have blurred a bit.
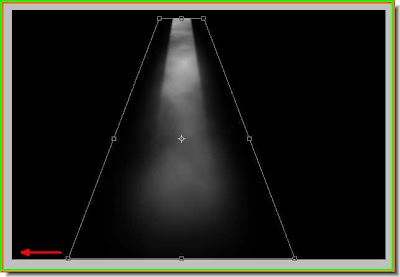
Step 29 : Keeping CTRL+SHIFT+ALT pressed drag the bottom left or right corner handle outwards. Press Enter to apply the transformation.
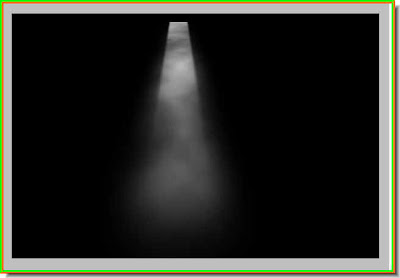
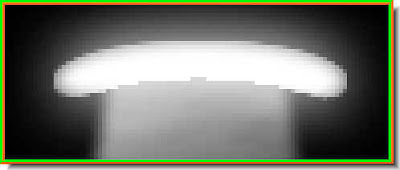
This is how the image looks. This is our light beam. Step 30 : Click on the Zoom Tool.
Step 31 : Zoom onto the top of the light beam.

Step 32 : Click on the Elliptical Marquee Tool to select it.

Step 33 : Draw an elliptical selection as shown above on the top of the light beam.

Step 34 : Press CTRL+BACKSPACE to fill the selection with the Background Color which is White.
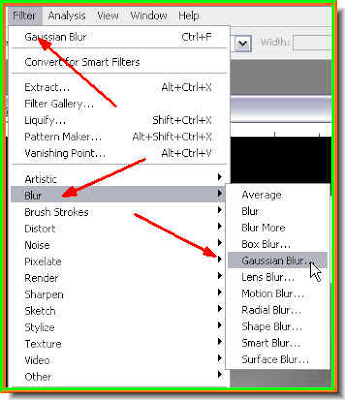
Step 35 : Go to Filter>Blur>Gaussian Blur.
Step 36 : I have set a Radius of 2 pixels in Gaussian Blur dialogue box. Click ok.

This is how the image looks.
Step 37 : Click on the Add Layer Style button.
Step 38 : From the popup click on Outer Glow.

Step 39 : In the Outer Glow dialogue box click on where the small white hand points to to bring up the Color Picker. We have to change the default yellow color of the Outer Glow to White.

Step 40 : In the Color Picker click on the White to select it. Click ok in the Color picker.

Step 41 : In the Outer Glow dialogue box drag the Size slider quite a bit. I have set it at 10 pixels. Click ok.
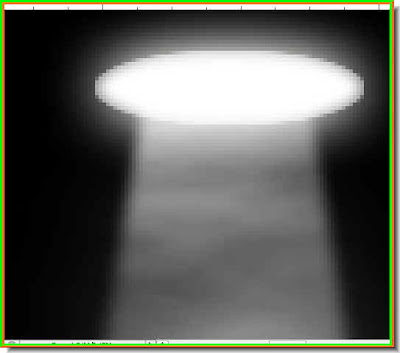
This is how the light beam looks how. What we have added is the light source to the beam.
Step 42 : This and the following few steps can be omitted by those using PS 7. These can be done only in PS CS 2 and above. Press CTRL+T and a selection appears.

Step 43 : Right click inside the selection and a popup appears. Click on Warp. (This is not available in PS7).

Step 44 : A grid like this appears.

Step 45 : Drag up the handle as shown as shown.

Step 46 : Now push up the other handle. Press Enter once you are done.
This is how the image looks.

Step 47 : Click on the Erazer Tool.
The Erazer Tool. You can make the brush tip larger or bigger with the [ ] bracket keys. Use the [ (left bracket) to make it smaller or ] (right bracket) to make it bigger. Also you need to make the brush tip soft. To do this press SHIFT and press the [ (left bracket) a number of times.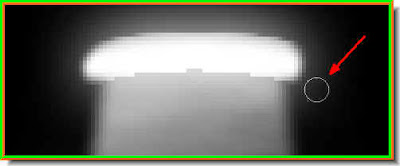
Step 48 : Eraze the sides as shown.

Zoom out. This is how the light beam looks. It looks like a light beam from a spotlight.
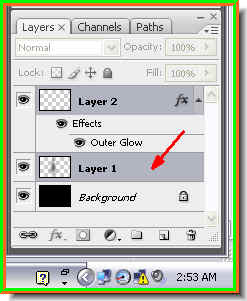
Step 49 : Now press SHIFT and click on Layer 1. We were working on Layer 2. Both layers are highlighted.
Step 50 : Press CTRL+E. This will combine the two layers into one. Now only Layer 2 remains above the Background layer. Our spotlight is complete.
PART II
 I have downloaded this royalty free photo from here.
You will plenty of royalty free photos which you can download for free for your use from http://www.sxc.hu/home I have deleted the background.
Step A : This is the downloaded photo.

Step B : Click the Magic Wand Tool to select it.

Step C : I have clicked on the silhouette on the left with the Magic Wand Tool. A selection immediately forms around it.

Step D : Go to Select>Similar.

Step E : Note that all the silhouettes are now selected.
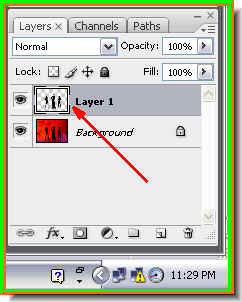
Step F : With the selection in place, press CTRL+J. This will copy and place the selection onto a new layer i.e. Layer 1.
Step G : Now click off the eye icon of the Background layer.

Step H : Click on the Erazer Tool.

Step I : This is how the image looks. I need the Erazer Tool to wipe out some black patches that have also been selected. You can see the blotches in the illustration above.

Step J : I have erazed the black spots.
No comments:
Post a Comment