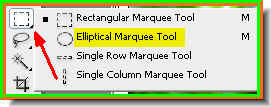
Step 3 : Click the Marquee Tool and from the flyout select the Elliptical Marquee Tool.
Step 4 : I have drawn a selection using the Elliptical Marquee Tool.

Step 5 : Click the Gradient Tool to select it.

Step 6 : Click in the top panel where the white arrow points to. This will bring up the Gradient Editor.

Step 7 : When the Gradient Editor opens choose the Black, White. It is the third from the left in top row. The small white hand points to it.

A closer look at the Black, White Gradient (It is the one the small white hand points to). Click ok in the Gradient Editor.

Step 8 : With the Gradient Tool drag from left to right across the selection. Step 9 : The Gradient has been applied. Press CTRL+D to deselect.

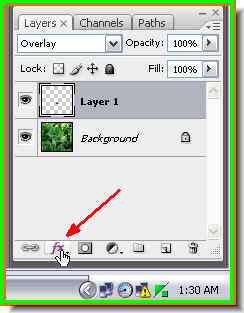
Step 10 : In the Layers pallete change the Blend Mode to Overlay.

The water drop has begun to take shape.
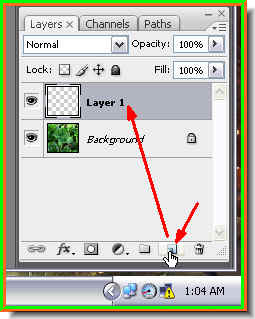
Step 11 : Click the Add Layer Style button. (This is CS 3. The Add Layer Style looks a bit different in Photoshop 7, but it is found in the same place).
Step 12 : From the pop up click on Blending Options.

Step 13 : The Layer Style dialogue box opens.

Step 14 : On the left panel click on Drop Shadow where the arrow points to. It will open the Dop Shadow controls.

Step 15 : Now set the Controls of the Drop Shadow. First uncheck Global Light and put the Angle at 158. Reduce the Opacity to 50 %. Drag the Distance slider to 7 pixel. Leave the other settings unchanged. DO NOT CLICK OK.
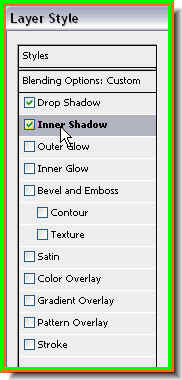
Step 16 : Now click on Inner Shadow. Click where the arrow points to. This will reveal the controls of Inner Shadow.

Step 17 : In the Inner Shadow Controls uncheck the Use Global light and change the Angle to
- 29. Now click ok in the Layer Style dialogue box.

The water drop has formed.

Step 18 : Click on the Brush Tool to select it.

Step 19 : Click the small bent arrow to change the Foreground Color to White.

Step 20 : Click in the top panel where the arrow points to.

Step 21 : The Brushes pallette opens. Set the Master Dkameter to 5 pixel and Hardness to 100%.

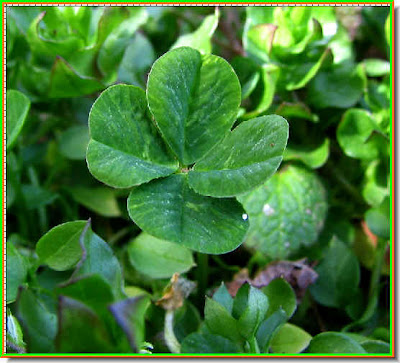
Step 22 : Place a white dot with the Brush Tool on the water drop. The watre drop is complete. But should want a number of water drops follow the subsequent steps also.
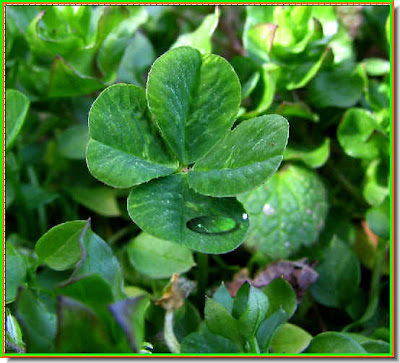
This is how the single water drop looks.
Step 23 : Press CTRL+J on the keyboard and you will get a duplicate of the waterdrop layer. A Layer 1 copy 2 forms.

Step 24 : Press CTRL+T on the keyboard. A selection forms around the waterdrop.

Step 25 : Click the Move Tool.

Step 26 : With the Move Tool reposition the second waterdrop wherever you want it. Drag he corners to make this waterdrop slightly smaller. Press ENTER when you are satisfied with the effect. The selection around the waterdrop will disappear.
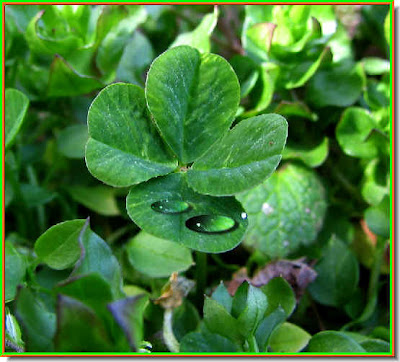
This is how the second waterdrop looks.

Step 27 : Press CTRL+J. This will duplicate the second waterdrop layer.

Following the steps described above, I have added another waterdrop. You can make as many waterdrops as you want. Just go on duplicating the layers, reposition the new waterdrop with the move Tool and resize it. And, you are done. That is all.
No comments:
Post a Comment