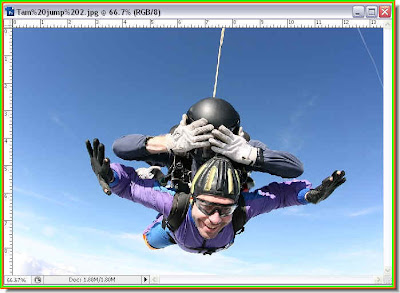
Step 1 : I have opened this photo to turn into a silhouette. You can turn any image into a silhouette with the method I am going to show you by using a Vector Mask. This is a better method of because if you resize the silhouette, no pixels are lost i.e. the image does not deteriorate with resizing. Even if you have not seen the earlier tutorial on the Pen Tool, you will have no dificulty in following as I have explained it in detail in this tutorial. But the two tutorials are different. You should have a look at the earlier tutorial when you have time.

Step 2 : Click the Pen Tool to select it. Step 3 : On the top panel at left click this icon. It is the Shape Layers icon.
 Step 4 : Click the Zoom Tool to select it.
 Step 5 : Use the Magnifying Glass icons with the plus and minus signs in the top panel to zoom in or out of the image.
 Step 6 : I have zoomed in on the image.
Step 7 : Since I clicked on another tool, i.e. Zoom Tool, the Pen Tool is no longer selected. Therefore you have to click on the Pen Tool again to select it. Make sure that Shape Layer as explained in Step 3 is selected.
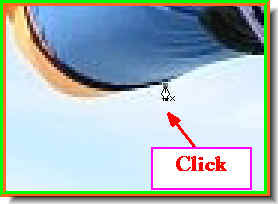
Step 8 : I have clicked the first point with the Pen Tool.
Step 9 : As soon as you click a point with the Pen Tool a Shape Layer 1 forms above the Background layer in the Layers Pallette.
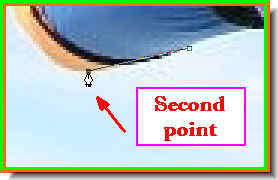
Step 10 : I have clicked a second point with the Pen Tool.
Step 11 : I have clicked and without letting go of the left mouse button dragged, which forms a line to the second point. You will notice that two handles become visible. You have to manipulate these handles to take the line around curves.

Step 12 : Press ALT and click the left handle. It disappears. Step 13 : Now click another point with the Pen Tool and drag the left handle to manouvre the line around the curve. Note the black fill.
 Step 14 : Again press ALT and it will delete the left handle. This is the trick of using the Pen Tool. You have to do it over and over again till the whole selection is complete.
 Step 15 : I have progressed sone more with the selection. I am clicking with the Pen Tool, then clicking the next point, dragging the left handle to align the selection and then pressing ALT to delete the left handle. But note the black fill. It will soon get to be a problem, because it is solid black and you will not be able to see the image. But that is not a problem. There is a way around that.
Step 16 : In the Layer pallette lower the Opacity to 50%.
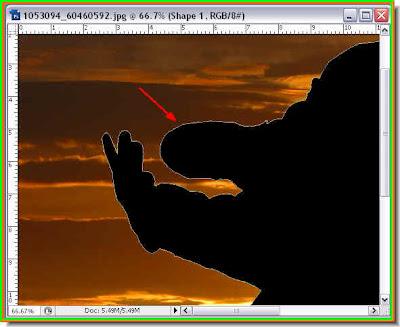
Step 17 : You can see now that the solid black fill has become a shade of grey and the figure is visible. Now that I have shown how the Pen Tool works, just carry on till you have selected the entire image.
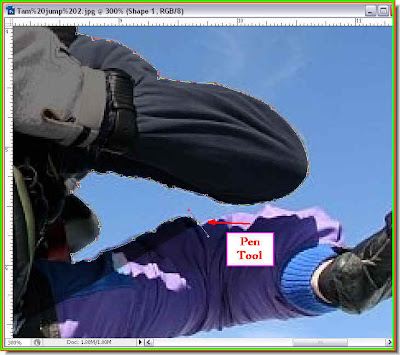
Step 18 : I am working around the image. Now that I have shown you the trick of working with the Pen Tool, you will never want to work with selection tools like the Magnetic Lasso. You cannot zoom into the image while working with the lasso tools, but you can do it if you are using the Pen Tool. Therefore your selection will be perfect and accurate with crisp edges.
Step 19 : The entire figure has been selected with the Pen Tool.

Step 20 : Look in the Layers pallette. You will find the entire selection in Shape 1.

Step 21 : Now increase the Opacity to 100%.

Step 22 : This is how the selection looks. It is fully black now after increasing the Opacity to 100%.
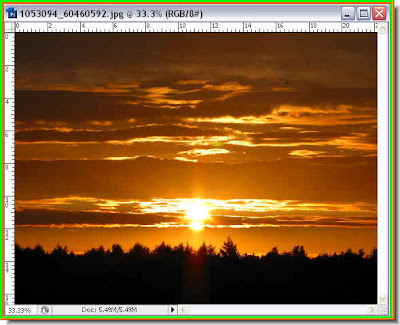
Step 23 : I have now opened this image against which I will place the silhouette.

Step 24 : Click the Move Tool to select it.

Step 25 : Drag the silhouette onto the sunset image.

Step 26 : The silhouette is now on the sunset image.
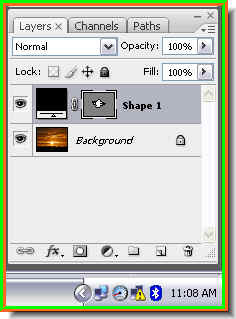
This is how the Layers pallette looks now. Step 27 : Press CTRL+T. A selection appears around the silhouette.
Step 28 : Keeping SHIFT+ALT pressed drag a corner handle outwards. The silhouette will increase proportionately. Press Enter.

Step 29 : After you press Enter, you will a thin selection still remains around the silhouette.

Step 30 : Just click the Lasso Tool and the selection will disappear.

Step 31 : The selection has disappeared.
Step 32 : If you look closely you will notice a white line around the edges of the silhouette. This has to be got rid off.
Step 33 : Click on the Paths pallette to reveal it.

Step 34 : Click once in the area under the Shape 1 Vector Mask.

Step 35 : Now go back to the Layers pallette.

Meanwhile, this is how the silhouette looks. The white line around it has disappeared.

Step 36 : Click on the Add Layer Style button. (It looks a bit different in PS7, but is found in the same place).

Step 37 : From the popup, click on Blending Options.

Step 38 : In the Layer Styles dialogue box click on Outer Glow in the left panel to reveal the Outer Glow settings.

Step 39 : Now drag the Size and Spread settins in that order till you are satisfied. As you drag the sliders you will be able to see the effect on your image. Click ok when you are finished. I am leaving the Outer Glow at the default yellow. You can change the color by clicking on the yellow box, which will bring up the Outer Glow color picker. Click in the Spectrum in the middle to select a color. After selecting a color you can select a shade from a box which opens at the left. Click ok.

This is the completed silhouette. The Outer Glow has been added. That is all.
No comments:
Post a Comment