
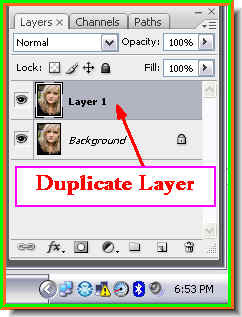
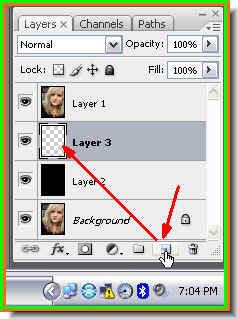
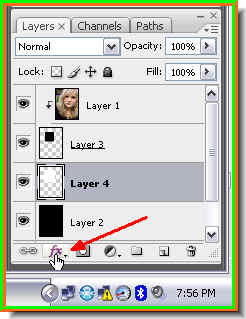
Step 2 : Press CTRL+J on the keyboard to duplicate the Background layer. Step 3 : Press CTRL on your keyboard and click the New Layer icon shown by the small white hand in the Layers pallette. It will create a new blank layer below Layer 1.
 Step 4 : Make sure the Foreground Color is set to Black and Background to White. If not then press 'x' and then 'd' on your keyboard.
Step 5 : Press ALT+BACKSPACE. This will fill the blank layer with the Foregound Color, which in this case is Black.
Step 6 : Add another blank layer above Layer 2 by clicking the New Layer icon. Step 7 : Click the Rectangular Marquee Tool to select it.
Step 8 : Draw out a selection anywhere in the image. I have drawn my selection.
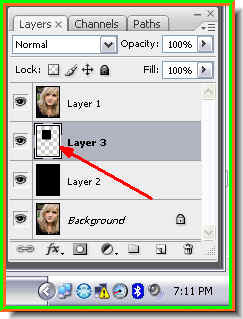
Step 9 : Now fill the selection with the Foreground Color which is Black in this case. You will not notice any difference in the image after filling with Black. Press ALT+BACKSPACE to fill with Black. Look in the Layers pallette and you will notice a small balck square on Layer 3, which is the selection filled with Black. Step 10 : Now click on the Layer which contains the duplicate image. Then press ALT+CTRL+G on your keyboard. This will create a 'Clipping Mask'. This means is that Layer 1 will be 'clipped' by the filled selection on the layer below it. When the clipping takes place a small bent arrow appears on the left of the layer thumbnail pointing down (Blue arrow) to the layer below.
 Step 11 : Note this is how my image looks.
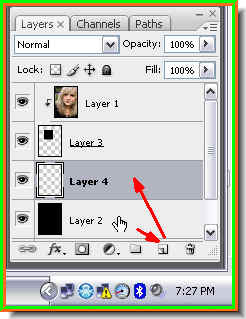
Step 12 : First click on Layer 2, then click the New Layer icon and a New Layer -- Layer 4 --forms above Layer 2. Step 13 : Click the Rectangular Marquee Tool again.
 Step 14 : Draw out a 'border' with the Rectangular Marquee Tool as shown above.
 Note that we are working on Layer 4. A layer that we are working on is always highligted.
Make sure that the Foreground is set to Black and Foreground to White. Step 15 : Press CTRL+BACKSPACE. This will fill the selection with the Background Color or White in this case. You can see the filled section in the Layer thumbnail on Layer 4.

Step 16 : The selection has been filled with White. Press CTRL+D to deselect. This will remove the selection of marching ants.
Step 17 : Click the Add Layer Style button.
Step 18 : From the popup click on Drop Shadow.

Step 19 : In the Drop Shadow controls, change the Angle to between 120 and 125 and lower the Opacity to between 35 % and 40 %. Click ok. You will not notice the effect immediately. You will after the collage has been created.

The Drop Shadow has been added.
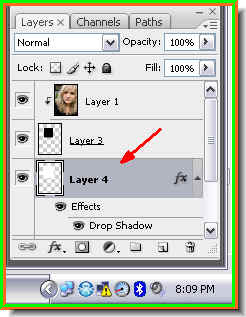
Step 20 : Note that we are on Layer 4 right now. I need to select Layer 3 also which is just above it. 
Step 21 : Press SHIFT on the keyboard and click on Layer 3. Now both Layer 4 and Layer 3 will be selected.
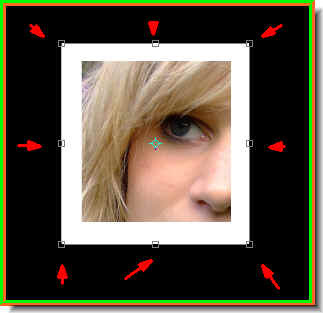
Step 22 : Press CTRL+T on the keyboard. This is the Free Transform command. You will see a selection form with corner handles.
Step 23 : Hover your cursor on any corner of the image and you will see a small bent, double headed arrow appear. This will allow you to rotate the selection.

Step 24 : By clicking on the bent arrow you will be able to rotate the selection in any direction you want. Note that the white border is only moving, not the image inside. We are not moving the actual image.

Step 25 : Click the arrow in the top right of the panel to apply the transformation.
 Step 26 : Layer 3 and 4 are already selected. We now also need to select Layer 1. Therefore press Shift on your keyboard and click on Layer 1 to select it also.
 Step 27 : Press CTRL+G on the keyboard. This will group the three layers into a group called 'Group 1'.
 If you click on the arrow at left on Group 1, the three layers are revealed.
 Step 28 : Now drag Group 1 to the New Layer icon and a new 'Group 1 copy' forms.
Step 29 : Click the arrow on left of Group 1 copy. It reveals Layer 1 copy, Layer 3 copy and Layer 4 copy.

Step 30 : Click on Layer 4 copy. Then press Shift and click on Layer 3 copy. This will select both the layers. They are both highlighted.
Step 31 : Press CTRL+T. The Free Transform command comes up. A selection forms.
Step 32 : Place the cursor on the image.

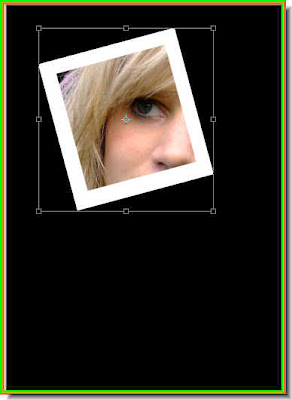
Step 33 : Drag in any direction. I have dragged down.

Step 34 : Hover your cursor on a corner and the small bent arrow appears. Use it to rotate the selection.

I have repositioned the selection so that the woman's eyes are visible. Press Enter to apply the transformation.
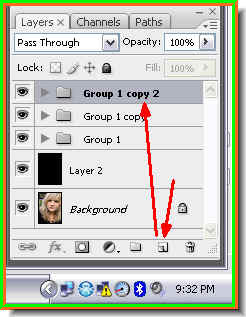
Step 35 : Now drag the Group 1 copy to the New Layer icon and you will get Group 1 copy 2.
Step 36 : Click the arrow at the left of Group 1 copy 2 to reveal Layer 4 copy 2 and Layer 3 copy 2.

Step 37 : Click on Layer 4 copy 2 to select it, then press Shift and click on Layer 3 copy 2 to select both layers.
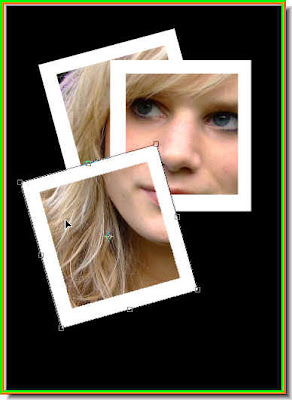
Step 38 : Place the cursor in the middle of the image and drag. Then rotate the selection. Press Enter to apply the transformation. This is the trick. Step 39 : Now drag Group 1 copy 2 to the New layer icon and Group 1 copy 3 forms.
Step 40 : Click the arrow on the left of Group 1 copy 3 to reveal Layer 3 copy 3 and Layer 4 copy 3. Select one of them. Press shift and click the other. This will select both.

Step 41 : Place you cursor on the image and drag, then rotate. This is how you have to make the polaroids by doing these steps over and over again.
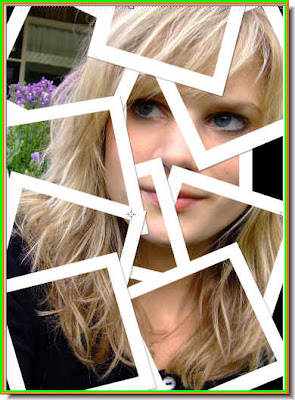
The finished collage or polaroid effect.
No comments:
Post a Comment