This is the sixth part of the image makeover tutorial in Photoshop. The last part of the tutorial is here
We will now turn our attention to the eyebrows. Like the eyelashes, the eyebrows may not be perfect in the imagel that you choose.
You will find the eyebrow brush at this link
It is in a rar file. You will need winrar to extract it. You can also search Google for free eyelash brushes. You will find plenty.
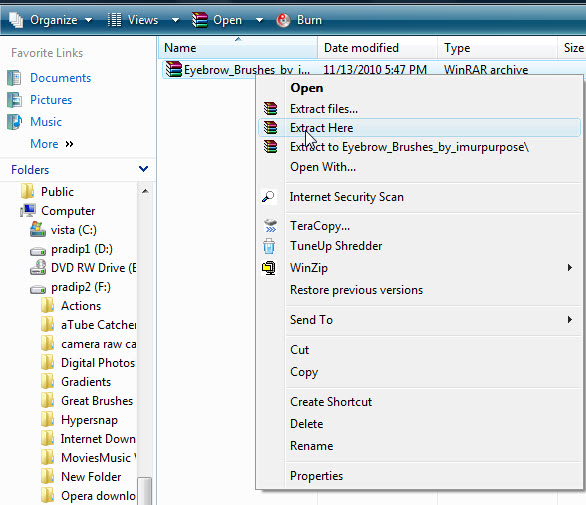
Download the file to a folder on your computer. After installing winrar you will be able to extract the file. Right click the file and from the menu click on Extract Here

The Brush has been extracted.

Here is the Brush.

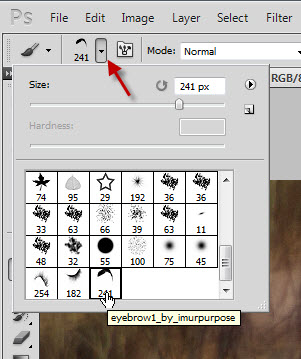
Step 1 : Open the psd file we have been working on. Press b to bring up the Brush Tool. Click the arrow to bring up the controls, then the tiny arrow and go to Load Brush.

Step 2 : Navigate to the folder on your computer where you have downloaded the Brush and click to load the Brush into Photoshop.

Step 3 : Bring up the Brush dialogue. You will find the Eyebrow brush right at the bottom.

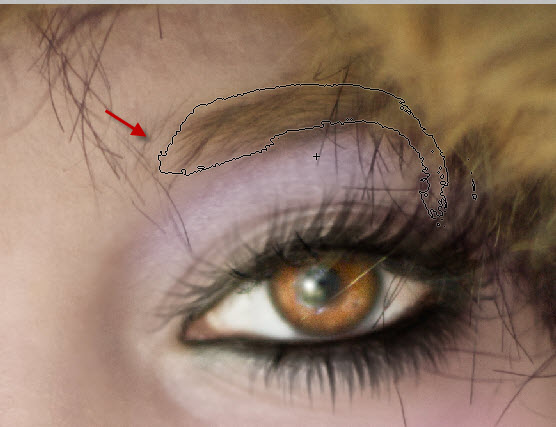
This is how the image looks so far.

This is how the Layers pallete look like.

Step 4 : Make another composite Layer 16 by pressing CTRL+SHIFT+ALT+E.

Step 5 : Click the New Layer icon and a new blank layer forms -- Layer17.

Step 6 : Press b to bring up the Brush Tool Click on top and then click the eyebrow brush right at the bottom.

Step 7 : Zoom into the eyes.

Step 8 : Press b to bring up the Brush. The eyebrow brush has been selected.
Step 9 : Position the Brush over the eyebrow. Press ] (right bracket) to make the Brush larger.

Step 10 : I have clicked once with the Brush.

Step 11 : Lower the Opacity of the layer.

Step 12 : Press CTRL+T. A selection forms around the eyebrow.

Step 13 : Hover the cursor around a corner. Use the bent arrow to rotate the selection. Pull the right and bottom middle handles out to fit the eyebrow accurately. Press Enter when finished.

Step 14 : Press Alt and click the Layer Mask icon.

Step 15 : The original eyebrow is revealed.

Step 16 : Since the Brush Tool is already selected. Go over to the Brush controls and click on a soft brush. Ensure that the hardness is set to 0.

Step 17 : The Brush is still very large.

Step 18 : Press the [ (left bracket) to make the Brush small enough to be able to paint the eyebrows.

When you use a Black Layer Mask, the Foreground Color automatically changes to White.

Step 19 : As you use the brush on the eyebrow, the new eyebrow is revealed. A portion of the eyebrow is hidden in the original image, therefore reveal as much as in the original image.

Step 20 : Click the new layer icon and a new Layer 18 forms.
Step 21 : Press b to bring up the Brush Tool. Click the eyebrow brush.

Step 22 : Make the brush larger by pressing ] (right bracket). The eyebrow is the wrong way around. That will be fixed later. Click once with the Brush.

Step 23 : Press CTRL+T. A selection forms.

Step 24 : Place the cursor in the middle of the selection and right click. From the pop up menu click on Flip Horizontal.

Step 25 : As soon as you click Flip Horizontal, the eyebrow is flipped.

Step 26 : Position the eyebrow correctly. Drag the left and bottom corner handles to align the eyebrow. Press ENTER.

Step 27 : Drag the Opacity of the layer suitably. It will depend on your image.

Step 28 : Press ALT and click the Layer Mask button. A Black Layer Mask forms next to Layer 18.

Step 29 : Press b for the Brush Tool. Click on the top and click on a soft brush. The Hardness should be set to 0.

Step 30 : Make the Brush small by pressing the [ (left bracket).

Step 31 : Paint over the eyebrow to reveal the newly painted eyebrow.

Step 32 : Click on the Eyedropper Tool.

Step 33 : Click on Layer 16 composite layer.

Step 34 : Click on the eyebrow with the Eyedropper Tool.

Step 35 : The Foreground Color changes to the color picked.

Step 36 : Click on Layer 18 which is the topmost layer.

Step 37 : Click the new layer icon. A New Layer 19 forms.

Step 38 : Change the Blend Mode to Color.

Step 39 : Press b to bring up the Brush Tool. Lower the Opacity of the Brush in the top panel to 50%.

Step 40 : Paint with the Brush.

Step 41 : This is how the image looks with the eyebrows added. Save your work as a psd. I will be continuing the tutorial. If you have saving your work as a psd difficult, flatter the layers. You can then continue.
The concluding part of the tutorial is here
No comments:
Post a Comment