This is the fifth part of the image makeover in photoshop. The last fourth part of the tutorial is here
 This is how the image looks so far.
 Layer 12 was the last layer we had worked on. It contains the eye shadow. Now to continue. We will be touching up the eye lashes.
We need some eyelashes for this. There are a lots of free high quality eye lash brushes on the internet. The Brush that I will be using is found here
 Step 1 : Press CTRL+SHIFT+ALT+E to make a new composite Layer 13.
 Step 2 : Make a new blank layer 14 by clicking the New Layer icon.
Download the eyelash brush to a folder on your computer. It will be an abr file.
 Step 3 : Press b to bring up the Brush Tool. Click in the top panel to bring up the Brush controls. Click the tiny black arrow at right. From there go to Load Brushes.
 Step 4 : Navigate to the folder where you have downloaded the brush and click on it to load.
 Step 5 : Bring up the brush controls by clicking in the top panel. You will find the new brushes at the bottom.
 Step 6 : Zoom into the image to see the eyes. Click on the upper eyelash brush.
 Step 7 : You can see the brush after you click it.
 Step 8 : The brush is the eyelash for the right eye (camera right). Press ] (right bracket) to make it large.
 Step 9 : In the top panel set the Opacity and Flow to 100%.
 Step 10 : I have clicked once with the brush above the eye. It does not fit exactly over the eye.
 Step 11 : Press CTRL+T. A selection forms around the eye lash.
 Step 12 : Hover the cursor at the corner. A small two headed arrow will appear. You can rotate the selection with it.
 Step 13 : With the bent arrow at the top and bottom of the selection you will be able to resize the eyelash.
Drag the middle corner handle at left to get a perfect fit for the eyelash over the eye. Press ENTER when finished.
 Step 14 : Press CTRL+J. This will duplicate Layer 14 into Layer 14 copy.
 Step 15 : Go to Edit>Transform>Flip Horizontal.
 Step 16 : Click on the Move Tool.
 Step 17 : Move the duplicated eyelash to the left eye.
 Step 18 : Move the eyelash over the left eye. Press CTRL+T to bring up the selection. Then use the Move Tool to position the eyelash accurately over the eye. Press ENTER when finished.
 Step 19 : Decrease the Opacity of Layer 14 and Layer 14 copy layers to 80%.
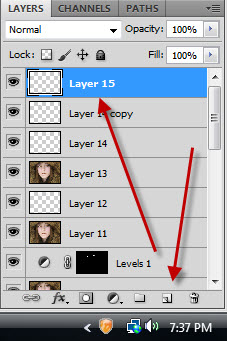
 Step 20 : Click the New Layer icon. A new Layer 15 forms.
 Step 21 : Zoom into the eyes. Press b to bring up the Brush Tool. Click the lower lash brush to select it.
 Step 22 : Click once with the Brush.
 Step 23 : Click the Move Tool. Press CTRL+T to bring up the selection. Place the eyelash in position and press Enter.
 Step 24 : Press CTRL+J. Layer 15 copy forms.
 Step 25 : Go to Edit>Transform>Flip Horizontal.
 Step 26 : Click the Move Tool.
 Step 27 : Press CTRL+T. A selection forms. Position the eyelash over the eye. Drag out slightly with the middle corner handle on the right and left as required. Press Enter.
 Step 28 : Lower the Opacity of Layer 15 and Layer 15 copy to 60% and 80% respectively. There is nothing hard and fast about this. It will depend on your image Lower the Opacity suitably.
 This is the image so far with the eye lashes added. Please save your work as a psd. I will be continuing this tutorial.
The sixth part of the tutorial is here


We need some eyelashes for this. There are a lots of free high quality eye lash brushes on the internet. The Brush that I will be using is found here


Download the eyelash brush to a folder on your computer. It will be an abr file.

Drag the middle corner handle at left to get a perfect fit for the eyelash over the eye. Press ENTER when finished.


The sixth part of the tutorial is here
No comments:
Post a Comment