You can create rays from a Shape built into Photoshop to give a special effect to your photos.

Step 1 : Open any photo in Photoshop to which you would like to add the rays.

Step 2 : Click the Custom Shape Tool. from the fly-out. You can see where it is to be found.

Step 3 : In the top panel click Shape and the where the red arrow points to. There are other Shapes built into Photoshop.

Step 4 : In the list of Shapes that opens, click on Nature.

Step 5 : As soon as you click on Nature, this dialogue box opens. Click OK

Step 6 : As soon as click OK, you will find the Shapes in the top panel replaced. I will be using the Shape shown by the red arrow. Click it to select.

Step 7 : The Foreground Color should be White. Use the small bent arrow to toggle between Background and Foreground Colors.

Step 8 : Drag with the Shape Tool to draw it out.

Step 9 : As soon as you finish dragging the Shape will fill with the Foreground Color which is White.

This is how the Layers palette looks. The Shape 1 layer is at the top.

Step 10 : Right click the Shape 1 Layer. From the pop up click on 'Rasterize Layer'.

Step 11 : Though you will not find any change in the image, look in the Layers palette. The Shape has been rasterized.

Step 12 : Go to Filter>;Blur>Gaussian Blur.

Step 13 : The Gaussian Blur dialogue box opens. I have set the Radius to 10 pixels because I am using a high resolution image. If you are using a low resolution image set it at less.
Click OK.

This is how your Shape should look like after applying the Gaussian Blur. It should blur a little only.

Step 14 : Go to Filter&g>Blur>Radial Blur.

Step 15 : The Radial Blur dialogue opens. Set the Amount to 100, the Blur Method to Zoom and Quality to Good or Best. Click OK.

This is the effect you should get.

Step 16 : Reduce the Opacity of the Shape 1 layer by dragging the slider. I have reduced it to 50 %.

This is how the image look after reducing the opacity.

Step 17 : Click the New Layer icon at the bottom of the Layers palette and a new Layer 1 forms as the topmost layer.

Step 18 : Click the Single Column Marquee Tool from the fly out to select it. You can see where it is found.

Step 19 : Click once in the middle of the rays just created as shown. A single column of marching ants will form.

Step 20 : Click the Paths palette. It is different from the Layers palette. Click the Make Work Path from Selection button in the Paths palette t the bottom. A Work path appears.

Step 21 : Click the Brush Tool.

Step 22 : In the top panel click where the red arrow points to. Click on the Hard Round 5 pixels brush to select it.

Step 23 : Note that the Foreground Color is White.

Step 24 : Right click the Work Path. On the dialogue box that opens click on 'Stroke Path'.

Step 25 : This dialogue box appears. Click OK.

Step 26 : The Path is stroked by the Brush.

Step 27 : Now click anywhere beneath the Work Path.

The Path disappears. The white line is visible.

Step 28 : Click back on the Layers palette.

Step 29 : Lower the Opacity of Layer 1 to 50 % by dragging the slider.

Step 30 : Press CTRL+T. Hover you cursor over the top of the line. A double headed bent arrow will appear. Use it to rotate the line. Press ENTER.

Step 31 : Click the Move Tool to select it.

Step 32 : Use the Move Tool to place the line appropriately on the rays.

Step 33 : Press CTRL+J. Layer 1 duplicates into Layer 1 copy.

Step 34 : Press CTL+T. Rotate the line. This is the line in Layer 1 copy. Press ENTER.

Step 35 : Press SHIFT and click on Layer 1. Both Layer 1 and Layer 1 copy are highlighted.

Step 36 : Press CTRL+E. Both the Layers merge into Layer 1 copy.

Step 37 : Press CTRL+J. Layer 1 copy duplicates into Layer 1 copy 2.

Step 38 : Press CTRL+T. Hover the cursor on a corner. The bent arrow appears. Use it to rotate the lines.
Press ENTER when done.

Step 39 : Press SHIFT and click on Layer copy. Both Layers are highlighted.

Step 40 : Both layers merge into Layer 1 copy2.

Step 41 : Press CTRL+J. Layer 1 copy 3 forms.

Step 42 : Press CTRL+T. Rotate the selection as earlier. Press ENTER when done.

Step 43 : Press SHIFT and click on Layer 1 copy 2. Both Layer are highlighted.

Step 44 : Both layers merge into Layer 1 copy 3.

Step 45 : Click on the Add Layers Style button on the Layers palette and click on Outer Glow from the pop up menu.

Step 46 : In the Outer Glow dialogue click on Set Color of Glow.

Step 47 : The Color Picker opens.

Step 48 : Use the slider in the middle to move it to the light blue shade. Click on a light shade in the box on the left to select it. Click OK in the Color Picker.

Step 49 : Drag the Spread and Size sliders slightly. You can see the values that I have given. Click OK in the Outer Glow dialogue box.

This is how the image looks.


This is how the image looks after lowering the Opacity.

Step 51 : Press SHIFT and click on Shape 1. Both layer are highlighted.

Step 52 : Press CTRL+E. Both layers have merged into Layer 1 copy 3.

Step 53 : Click the Add layer Mask button and a layer mask forms next to the layer thumbnail on Layer 1 copy 3.

Step 54 : Click on the Brush Tool. Note that Foreground Color has turned to Black after you clicked the Add Layer Mask button.

Step 55 : Click where the arrow points to and click on Soft Round 300 pixels brush.

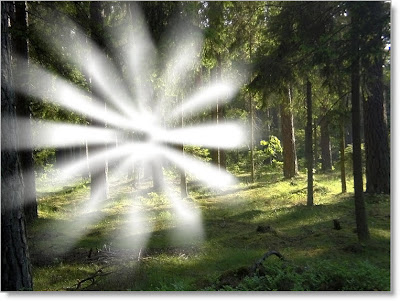
Step 56 : Paint away in the middle of the circle as shown.

The finished image.

I have clicked off the eye icon of the Background layer and added this image in its place.

Other photoshop tutorials are here.
No comments:
Post a Comment